¶ Full Backup of Unitree Go2 using Ubuntu [rkdeveloptool][non-Secure Boot only]
Making a full backup is an important step, and I don't recommend skipping it. The most crucial partitions are:
- pre-uboot.img (has some device-specific sensitive data like MAC addresses)
- uni.img (contains RSA device-specific keys used for MCU communication)
Other partitions are common among all Go2's and could be found on the Yandex drive. However, having a full backup guarantees complete software recovery.
To proceed with backup, install the necessary build dependencies. Open a terminal and run:
sudo apt-get update
sudo apt-get install -y git libudev-dev libusb-1.0-0-dev dh-autoreconfThis command installs git for cloning the repository, libudev-dev and libusb-1.0-0-dev for USB communication, and dh-autoreconf for building the tool. Clone the official rkdeveloptool GitHub repository (for 20.04):
git clone https://github.com/rockchip-linux/rkdeveloptool.gitIf you have an Ubuntu 22.04 or 24.04 use this fork instead:
git clone https://github.com/wing-kit/rkdeveloptool Navigate into the cloned directory:
cd rkdeveloptoolCompile rkdeveloptool from source:
autoreconf -i
./configure
makeOnce the build process is complete, install rkdeveloptool:
sudo make installTo ensure rkdeveloptool was installed correctly, you can run:
rkdeveloptool -hThis command should display the help information for rkdeveloptool, indicating successful installation.
First, let's remove the top cover from the robot. Please refer to video of disassembly of Go2
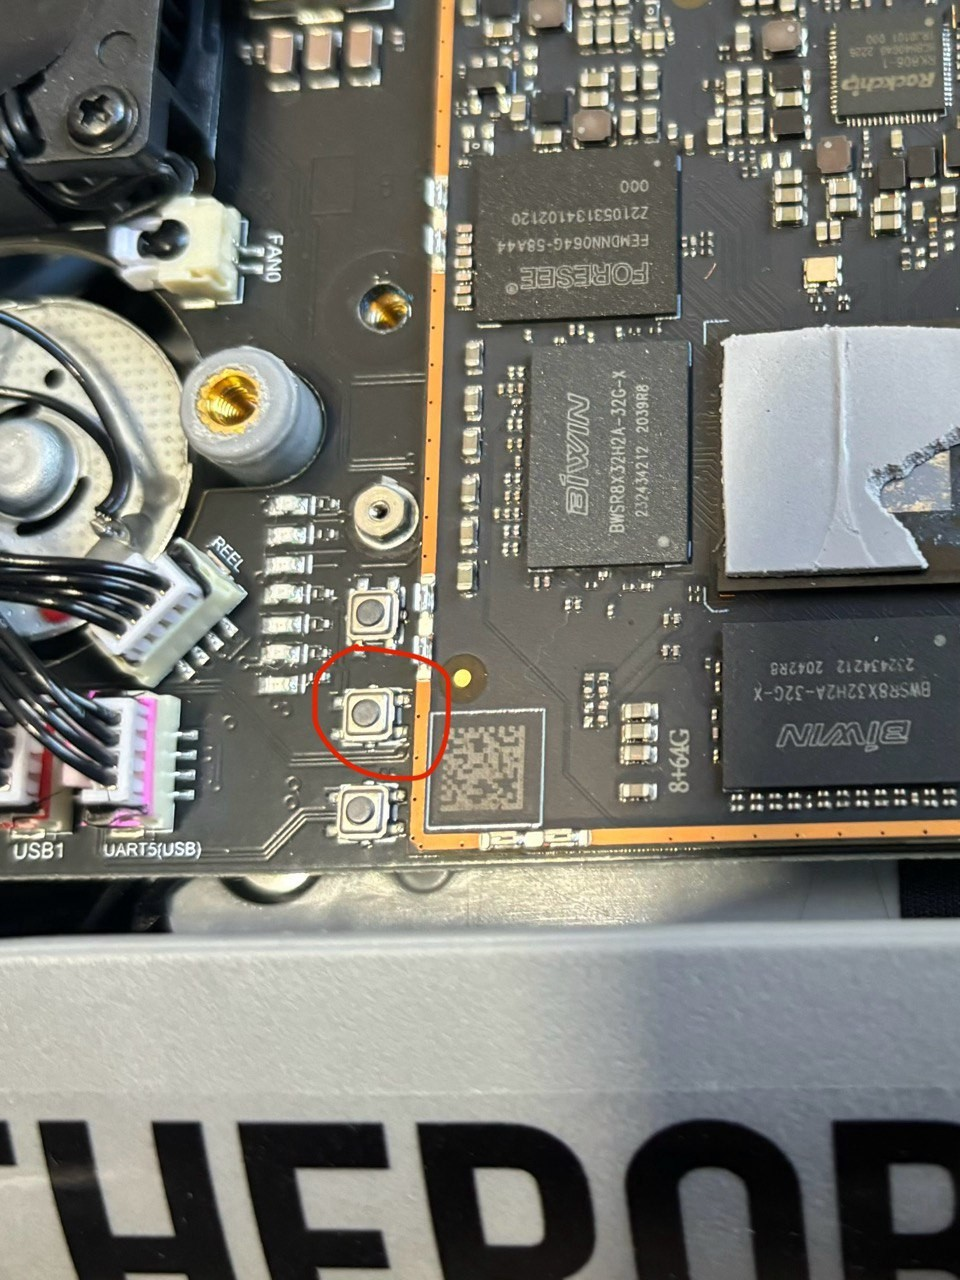
Load into MASKROM mode. First connect a USB Type-C cable from the device to the PC. Then, press and hold the middle button on the mainboard while turning on the Go2. The robot should not stand up after this action.

check it by running:
sudo rkdeveloptool ldIn order to proceed in MaskRom mode a special MiniLoader should be downloaded into RAM:
sudo rkdeveloptool db MiniLoaderAll.binIf the rkdeveloptool gets stuck at this moment, it means that you have a Secure Boot device. The following instructions will not work for you.
Check the partitions
sudo rkdeveloptool pptThe next step involves dumping the firmware. Lets save them all:
sudo rkdeveloptool rl 0x00 0x4000 preloader.img
sudo rkdeveloptool rl 0x4000 0x2000 uboot.img
sudo rkdeveloptool rl 0x6000 0x2000 misc.img
sudo rkdeveloptool rl 0x8000 0x1000 uni.img
sudo rkdeveloptool rl 0x9000 0x20000 boot.img
sudo rkdeveloptool rl 0x29000 0x40000 recovery.img
sudo rkdeveloptool rl 0x69000 0x10000 backup.img
sudo rkdeveloptool rl 0x79000 0x5500000 rootfs.img
sudo rkdeveloptool rl 0x5579000 0x1DC3000 userdata.imgAt that point it would be great to open the files in GHEX editor and visually check that the whole file doesn't consists of '0xCC'. If GHEX gets very slow opening large img files, try "hexedit".
!!!Keep that dump in a safe place, it will help restore the dog if something goes wrong!!!
For reference, the size for each partition img should be as follows. Note rootfs.img is over 45GB and userdata.img is almost 16GB. A full backup may take over 1 hour. Please make sure the Go2 battery is fully charged. Also keep in mind the Go2 will crouch down and stand up during the backup process, so make sure to use a high-quality long USB-C cable that allows movement of the Go2. It may be a good idea to tape the cable to the Go2 body, avoid putting too much strain on the USB-C port. One owner reported his port has been damaged from repeated use.
    33,554,432 backup.img
    67,108,864 boot.img
     4,194,304 misc.img
     8,388,608 pre_uboot.img
   134,217,728 recovery.img
45,634,027,520 rootfs.img
     4,194,304 uboot_factory
     2,097,152 uni.img
15,978,201,088 userdata.imgIt is possible to backup your Go2 running Ubuntu Live CD/USB (if Ubuntu OS isn't available) which doesn't install any new OS on the computer. Just make sure to install gcc, make, etc before compile rkdeveloptool. Also make sure to connect a large external hard drive to save the dump imgs, as Ubuntu may not recognize certain internal hard drives on the computer.